

Building a custom TensorFlow Lite model sounds really scary. As it turns out, you don’t need to be a Machine Learning or TensorFlow expert to add Machine Learning capabilities to your Android/iOS App.
One of the simplest ways to add Machine Learning capabilities is to use the new ML Kit from Firebase recently announced at Google I/O 2018.
ML Kit is a set of APIs provided by Firebase that
ML Kit is great for the common use cases described above, but what if you have some very specific use case? For example, you want to be able to classify between different kinds of candy boxes, or you want to be able to differentiate between different potato chip packets. This is when TensorFlow Lite comes in.

What is TensorFlow Lite?
TensorFlow Lite is TensorFlow’s solution to lightweight models for mobile and embedded devices. It allows you to run a trained model on device. It also makes use of hardware acceleration on Android with the Machine Learning APIs.
How do I train my own custom model?
There are a few steps to this process that we are going to take in order to build our own custom TensorFlow Lite model.

Training a TensorFlow model can take a long time and require a large corpus of data. Luckily, there is a way to make this process shorter and does not require gigabytes of images or tons of GPU processing power.
Transfer Learning is the process of using an already trained model and retraining it to produce a new model.
In this example, we will use the MobileNet_V1 model and provide it with our own set of images that we will retrain this model on.
This example is an adaption of these two codelabs (1 and 2) and this talk from Yufeng Guo.
Prerequisites:
We need to install TensorFlow in order to run this example. You will also need to make sure PILLOW is installed.
pip install --upgrade  "tensorflow==1.7.*"

pip install PILLOW
If the installation of TensorFlow doesn’t work, follow the instructions here.
Clone the following repository and cd into the directory:
git clone https://github.com/googlecodelabs/tensorflow-for-poets-2

cd tensorflow-for-poets-2
Step 1: Gather Training Data
For this part of the process, because we don’t have a large set of data to work with, taking a video recording of each chip packet will work well enough for our use case. With each video, we need to make sure we are getting different angles of the chip packet and if possible, different lighting conditions.
Here is an example of a video taken for of a chip packet:
We would need a video of each packet of chips that we want to identify.
Step 2: Convert Training Data into useful images
Once we have our videos from the previous step, we need to convert these into images. Using FFMPEG (a command-line tool for video processing), we can batch convert a video into images by running this command for each video, substituting the name of the mp4 file and the folder and image name:
ffmpeg -i flings.mp4 flings/flings_%04d.jpgStep 3: Folders of Images
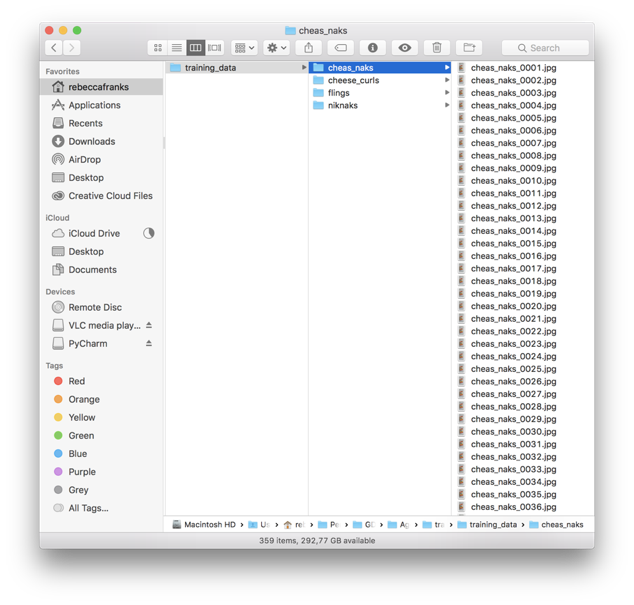
Once you have all your videos cut up into images, make sure you have a folder with all the training data. Inside the folder, make sure to group all the related images, into labeled folders (This would happen if you have done the above step). It should look something like this:
Step 4: Retrain the Model with the new images
Once we’ve got our training data, we need to retrain the MobileNet_V1 model, with our new images. This python script will be run in the folder that we have checked out from the prerequisites.
python -m scripts.retrain \
--bottleneck_dir=tf_files/bottlenecks \
--how_many_training_steps=500 \
--model_dir=tf_files/models/ \
--summaries_dir=tf_files/training_summaries/"${ARCHITECTURE}" \
--output_graph=tf_files/retrained_graph.pb \
--output_labels=tf_files/retrained_labels.txt \
--architecture="${ARCHITECTURE}" \
--image_dir=training_data/south_african_chips
We run the scripts.retrain python script, with our new training data referenced as the image_dir. This step will produce a retrained_graph.pb file.
Step 5: Optimise the Model for Mobile Devices
Once we are done retraining our model, we need to optimise the file to run on mobile devices. TOCO or “TensorFlow Lite Optimizing Converter” is a tool provided by the TensorFlow Library, that optimises the graph to run on mobile devices.
We pass our new retrained_graph.pb file that we created from the previous step, into this function.
IMAGE_SIZE=224
toco \
--input_file=AgencyDay/retrained_graph.pb \
--output_file=AgencyDay/chips_optimized_graph.tflite \
--input_format=TENSORFLOW_GRAPHDEF \
--output_format=TFLITE \
--input_shape=1,${IMAGE_SIZE},${IMAGE_SIZE},3 \
--input_array=input \
--output_array=final_result \
--inference_type=FLOAT \
--input_data_type=FLOAT
After running this step, we have a chips_optimized_graph.tflite file and a bunch of labels stored in the .txt file.
Side note: This step was honestly what took me a while to get working, there were a lot of issues I was experiencing and I ended up having to dive deep into TensorFlow libraries and building the whole TensorFlow library from source to be able to run TOCO. 🤷🏻
Step 6: Embed .tflite file into App or distribute via ML Kit on Firebase
Now open up the android folder from the checked out repository in Android Studio to build and run the project. Once you have it opened, navigate to a class called ImageClassifier . Inside here, there are two fields you need to update with your new TensorFlow Lite model that we have created.
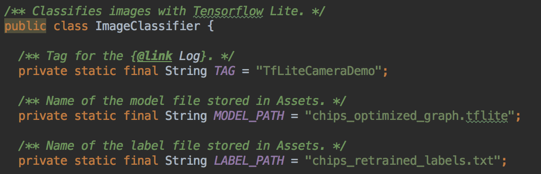
The MODEL_PATH and the LABEL_PATH will need to be updated with the names of the new files that you have created. You can place these files inside the assets folder in the app.
Step 7: Profit 🤑
Once we have retrained our model to our needs and embedded the new model in our app, we can run the app locally and see if it detects the correct chip packets. Here is an example of it working below:
Things to consider
- If you need to update your model, you would need to ship a new app update and hope that people download it. Another way to do this, without requiring an app update, is to host the model on Firebase. Have a read here for more information on how to do this.
- TensorFlow Mobile is the older version of TensorFlow for Android/Mobile devices. Make sure any tutorial you are following is using the new TensorFlow Lite and not TensorFlow Mobile
Hopefully, this inspires you to train your own Image Classifier and ship some cool features into your apps! Find me on twitter @riggaroo
References:
On-Device Machine Learning: TensorFlow for Android https://youtu.be/EnFyneRScQ8
Codelabs with more information: